Training Paths: Setup + Best Practices
Last updated: October 9, 2026
Before You Start
GOAL: Understand the five building blocks so the steps below make sense.
Tag | A skill label on an interviewer (e.g. “Java”). Trainees graduate INTO a tag. |
Interview Template | The saved schedule structure for a role/stage. Its events reference tags. |
Training Path | The “recipe” — which classes a trainee takes, which template events they join, and which tag they earn at the end. |
Class | One training instance: Reading (theory), Shadow (observe), or Reverse Shadow (lead, while observed). |
Trainee | An employee moving through In Training → Completed → Graduated. |
The build order is always the same: Tags → Templates → Training Path → Trainees → Graduation. The steps below walk you through each stage once, so you can repeat the process for every role you train.
At a Glance
The full setup flow on one page. Each step is explained in detail in the sections that follow.
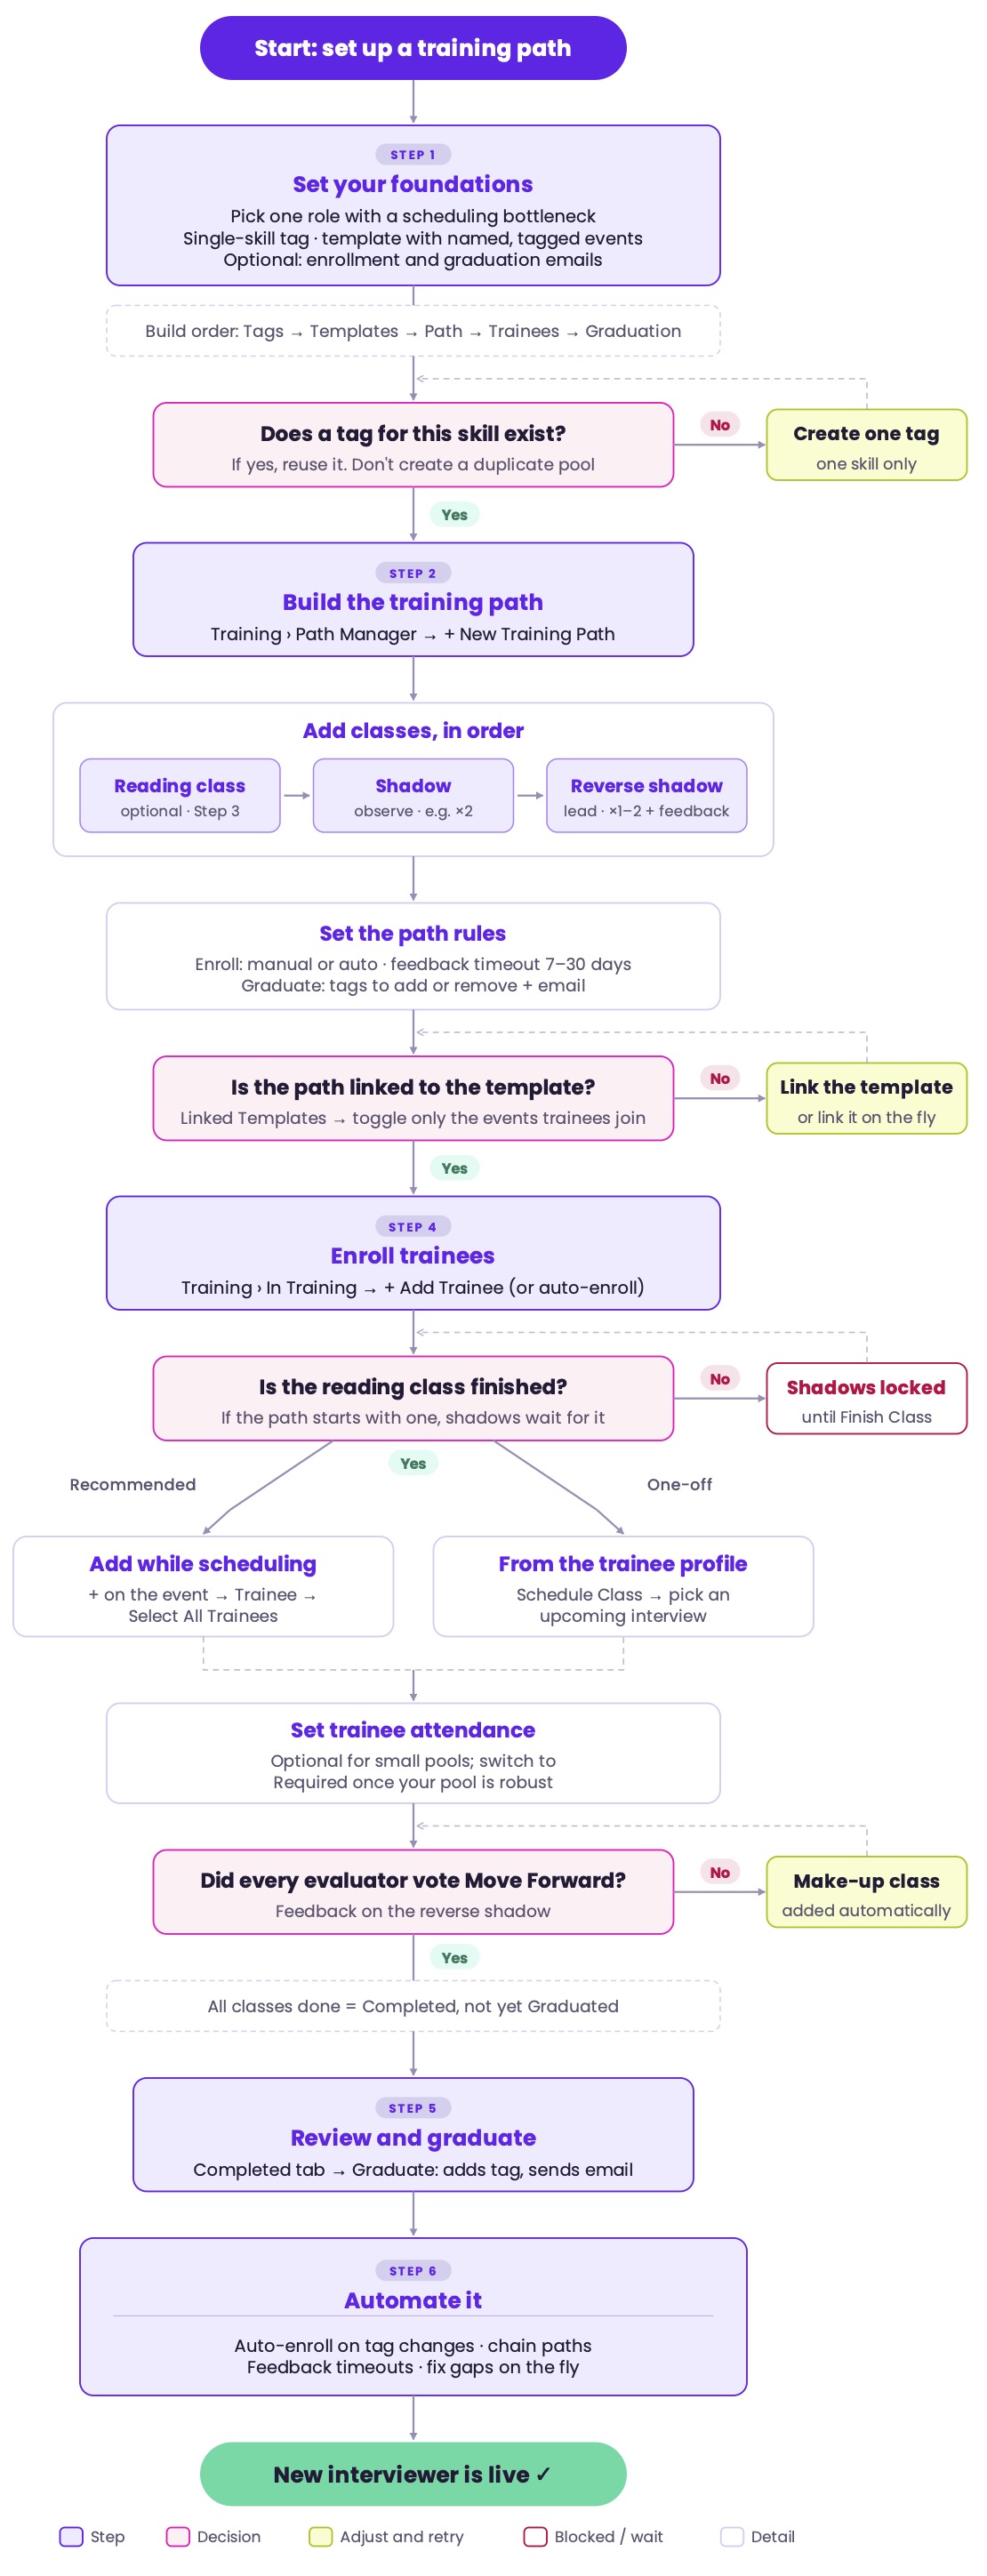
Step 1 — Set Your Foundations
GOAL: Have your tags, templates, and emails ready BEFORE you build a training path.
1.1 Pick your first role
Choose one role with a scheduling bottleneck or a hard-to-fill interview type (e.g. Backend Coding). Start with one path — you can replicate this process for every other role afterward.
1.2 Define the tag trainees will graduate into
Keep each tag to a single skill (e.g. “Java,” not “Java + Behavioral”) — combine tags later with Boolean logic if needed.
Reuse the same tag across multiple templates so it unlocks more than one interview.
If a tag already exists for this skill, reuse it — don't create a duplicate pool.
1.3 Prepare the interview template
Confirm the template exists for this role/stage (e.g. “Senior Java – Virtual Onsite”).
Give each event a clear, specific name (“Java Skills Test,” not “Panel 1”) — you'll need this to link the right event later.
Add the required tag to each event you plan to train for.
Decide which events trainees should actually join — don't link unrelated events like an Offer Call.
1.4 Create enrollment & graduation emails (optional but recommended)
Go to Communication > Email Templates.
Create two ‘Trainee’-type templates: one Enrollment, one Graduation (e.g. “Interviewer Training – [Path Name] – Enrollment”).
Keep the copy generic — welcome/congrats, what to expect, who to contact — so the same template works across paths.
Checkpoint: You should now have: a tag, a template with clearly named/tagged events, and (optionally) two email templates. Once all three exist, move to Step 2. |
Step 2 — Build Your First Training Path
GOAL: Create the path that ties your classes, feedback rules, and graduation tag together.
2.1 Create the path
Go to Training > Path Manager → + New Training Path.
Name it after the tag it leads to (e.g. “Backend Engineer – Java”) and add a short description.
2.2 Add classes, in order
Reading Class (optional) — add first if you want theory covered before any live session.
Shadow — add and set how many (e.g. 2). Feedback is usually off for shadows.
Reverse Shadow — add and set how many (usually 1–2). Turn on Feedback Automation here so evaluators vote Move Forward / Needs Retraining.
2.3 Set enrollment, feedback & graduation rules
Enrollment: choose manual or Auto-Enroll, pick Enrollment email, and set any tags to remove
Feedback (per class): choose who gives feedback, and your auto-advance timeout (7–30 days).
Graduation: choose auto- or manual-graduation, pick your Graduation email, and set which tag(s) to add/remove. Optionally auto-enroll into a follow-on path.
2.4 Link it to real interviews
In Linked Templates, add the template from Step 1.3.
Expand it and toggle on only the specific event(s) trainees should join.
Save. You'll now see a purple graduation cap on that event in the scheduler.
Tip: Forgot to link a template or add a trainee before you started scheduling? You can fix both without leaving the scheduler — see Step 6.3 |
Step 3 — Add a Reading Class (Optional)
Reading Classes are self-contained lessons built from chapters of text and links. Placed first in a path, they block shadows/reverse shadows until complete, so every trainee starts from the same baseline.
3.1 Build the class
Create a new Reading Class and give it a name.
Add chapters (sections) with formatted text and links to any external resources (videos, docs).
3.2 Attach it to the path
In your training path, add a class and set its type to Reading Class.
Select the class you built. Place it first in the sequence.
3.3 What the trainee experiences
They get an email to start the class, work through chapters in order, then click Finish Class — which unlocks their next class (e.g. a Shadow).
Step 4 — Enroll & Schedule Trainees
GOAL: Get real people into the path and into real interviews.
4.1 Enroll trainees
Go to Training > In Training → + Add Trainee.
Search for and select the employee, click Next.
Choose the training path(s) and click Done.
(Prefer this to be automatic? Skip ahead to Step 6.1 — Auto-Enroll.)
4.2 Schedule them into interviews
Two ways to do this:
A — During normal scheduling (recommended)
Click Request Availability / Schedule Now and pick a template linked to your path (look for the graduation cap).
Click the + next to that event → Trainee → Select All Trainees (GoodTime auto-picks whoever is available and closest to graduating).
Mark the trainee Optional (small pools) or Required (once your pool is bigger).
B — From the trainee's profile
Training > In Training → click the trainee → Schedule Class next to the class you want to fill.
Pick from the list of matching upcoming interviews → Schedule, Confirm.
4.3 Adjust an individual trainee's path as needed
Add or remove classes for that trainee only.
Mark a class Finished to grant credit for training done outside GoodTime.
Duplicate a class if they need a repeat.
Step 5 — Graduate Trainees
GOAL: Turn a completed trainee into a fully tagged, schedulable interviewer.
Finishing all classes moves a trainee to Completed — not Graduated. That gap is intentional: it's your checkpoint to confirm readiness before they host solo.
Review the trainee in the Completed tab (check history, optionally confirm with their hiring manager or bar raiser).
Click Graduate.
GoodTime then automatically: adds the graduation tag(s), removes any configured tags, sends the graduation email, and (if configured) auto-enrolls them into the next path.
Prefer less manual work?: Turn on auto-graduate in the path settings so trainees graduate automatically once all classes and feedback checks pass. |
Track your progress
Export training data to CSV anytime — path names, trainee status, and class history — for manager updates or bottleneck tracking. For graduation-rate trends by path (not individual detail), use the GoodTime Training Insights Report.
Step 6 — Automate It
GOAL: Remove yourself from the repetitive parts of the workflow.
6.1 Auto-Enroll trainees
Trigger enrollment off a tag change instead of adding people by hand — useful for recurring hiring waves or standard onboarding (e.g. every new manager).
Choose the tag event that should trigger enrollment (tenure hit, role change, promotion, etc.).
Point it at the training path(s) to enroll into.
You can also chain paths: on graduation from Path A, auto-enroll into Path B — useful for progressive tracks (Junior Java → Senior Java). Decide deliberately whether graduation should remove the old tag or let the interviewer keep both.
6.2 Automate feedback
On a class (usually Reverse Shadow), enable “Require training feedback before advancing.”
Set your timeout (auto-advance after 7–30 days, or never).
All evaluators must vote Move Forward for the trainee to pass; a single Needs Retraining adds a make-up class automatically (if that setting is on). Unresponsive evaluators after the timeout won't block the trainee — GoodTime auto-advances them, and you can see who didn't respond.
6.3 Fix gaps on the fly
Mid-scheduling and the template isn't linked, or your trainee isn't enrolled? Fix it without leaving the scheduler:
Click Link Training Path in the interview drawer to attach one to the template.
Search the trainee's name → Add Trainee (twice: once to find them, once to confirm enrollment) → continue scheduling as normal.
Quick Reference — Troubleshooting & FAQ
Trainees aren't being added to interviews | Check: the path is linked to that template/event · the trainee is enrolled · any prerequisite (reading class) is done · the trainee is available · whether Required is blocking scheduling with a small pool. |
Who can configure this? | Super Admins set up paths, tags, and automations. Coordinators manage trainees day-to-day. |
How does GoodTime pick which trainee to add? | Whoever is available for the slot AND closest to completing their path. |
Optional or Required trainees? | Optional for small pools (won't block scheduling). Switch to Required once your pool is robust. |
Can I bulk-remove trainees from a path? | No — remove them one at a time. |
Trainee declined a scheduled shadow — credit? | No credit given, and they aren't auto-replaced — assign a new trainee. |
Trainee got credit by mistake | Duplicate the class on their profile so they have to complete it again. |
Can I customize enrollment/graduation emails? | Yes — build them under Communication > Email Templates and select them in the path's settings. |
Where's a trainee's full history? | Their profile in the Training tab → History Log (every class, interview, and status change). |
Template got archived by accident | Support can restore it — have the template name ready. |
Getting Ready (Tags and Templates)›
Building Training Paths (Shadow, Reverse Shadow & Reading Classes)›
Managing Trainees (Enroll, Schedule, Graduate & Report)›
Automations & Advanced Workflows›