Auto-Confirm: Setup + Best Practices
Last updated: October 15, 2026
Before You Start
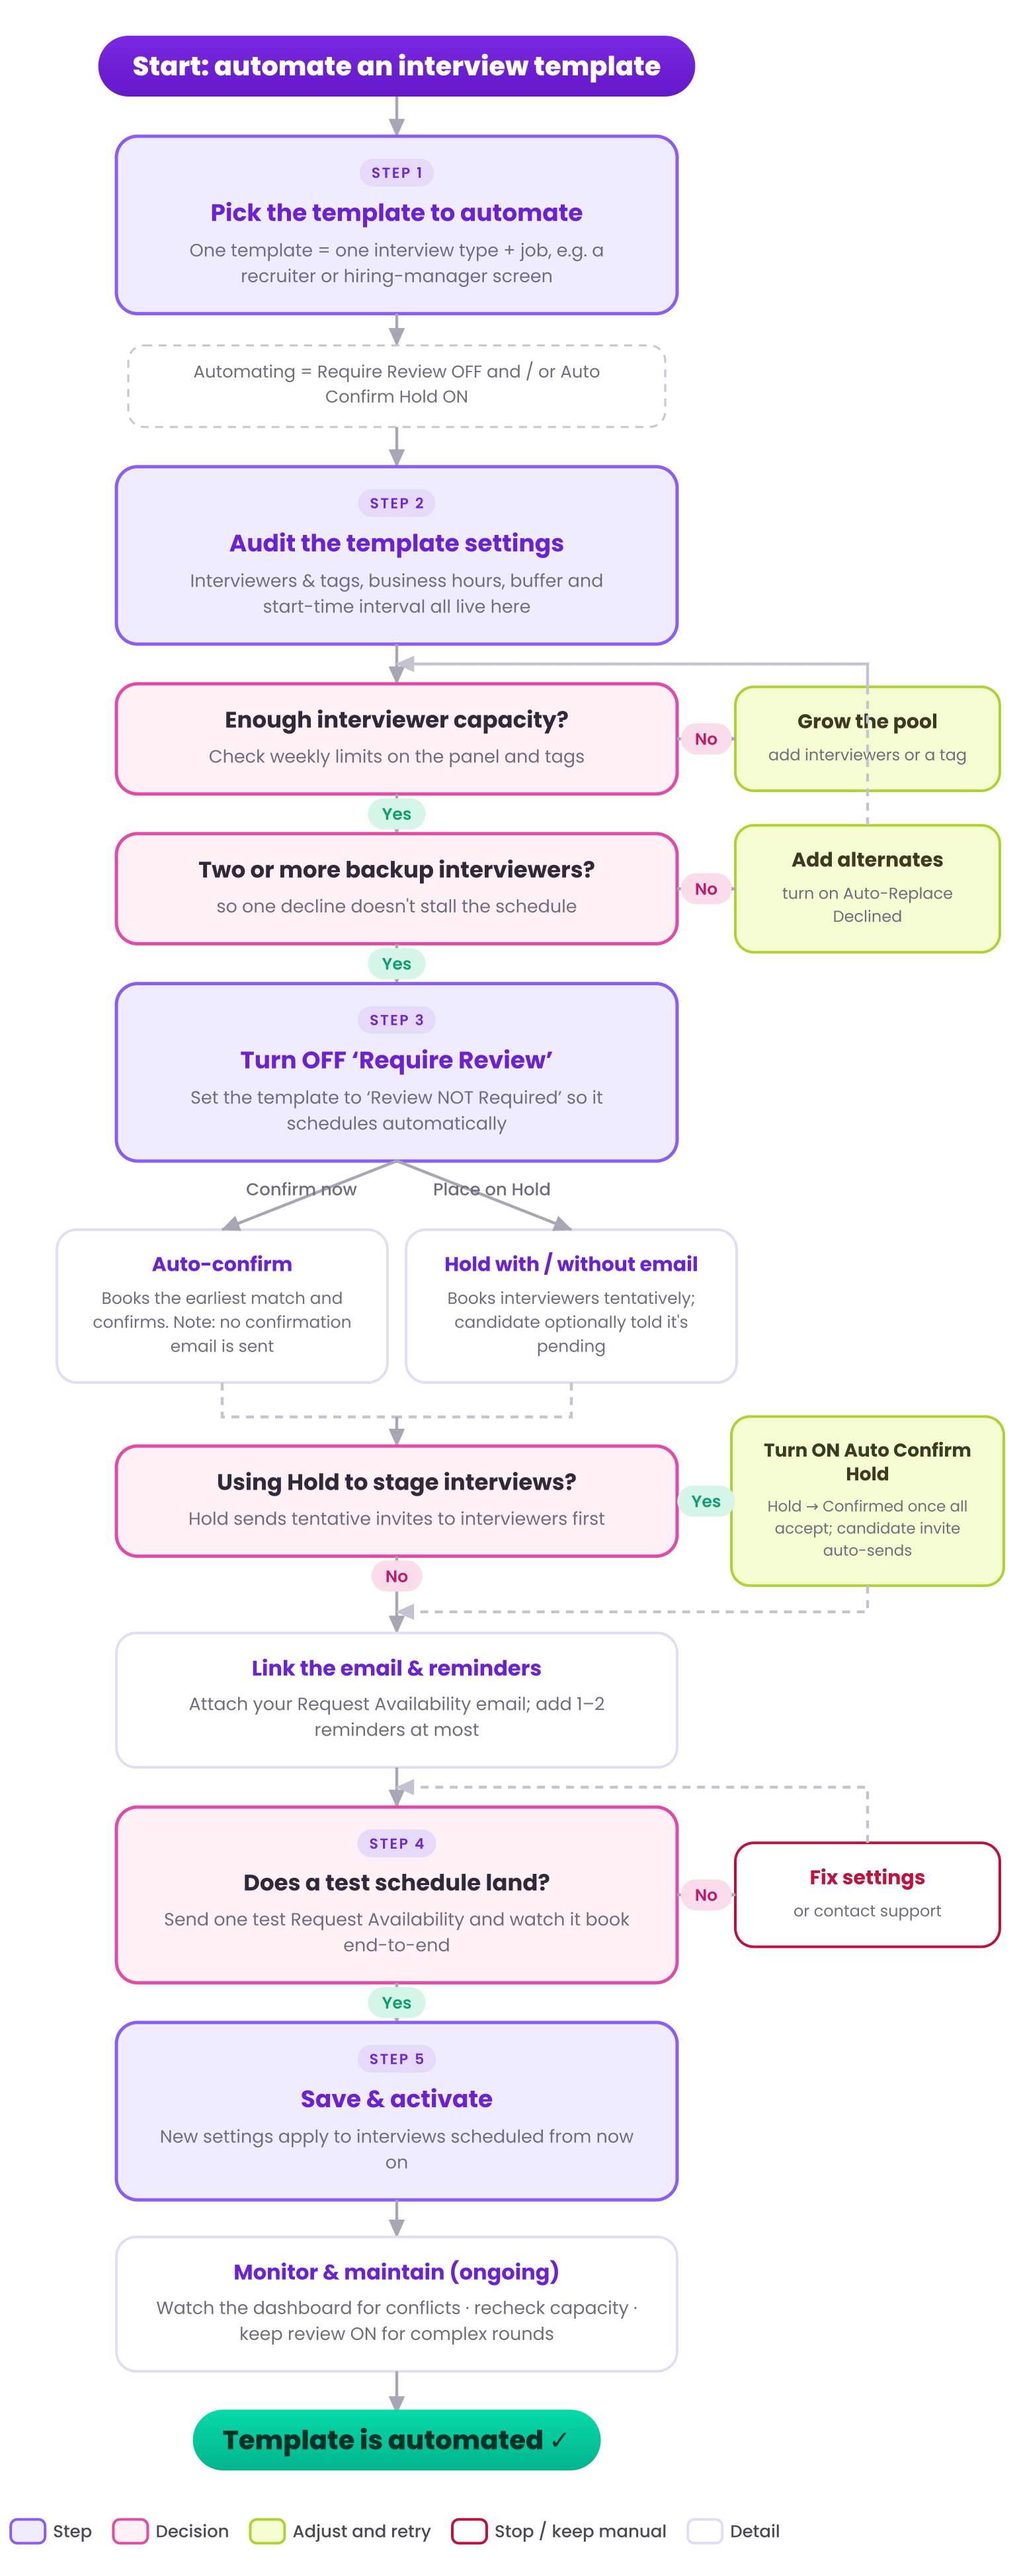
Use this template [make a copy] to track which templates you want to turn on auto-confirm for based on the diagram below.
A quick glossary so the rest of the guide makes sense. "Auto Confirm" means letting GoodTime confirm an interview from the candidate's availability instead of a coordinator confirming it by hand.
Term | What it means |
Require Review Before Scheduling | A setting that pauses scheduling so a coordinator reviews the candidate's availability and confirms the time by hand. Turn it off to let GoodTime confirm automatically. |
Automatic Scheduling (Auto Confirm) | With Require Review off, GoodTime matches the candidate's earliest availability to your interviewers' calendars, books it, and moves the interview to Confirmed — no coordinator click. |
Hold (with / without email) | GoodTime books interviewers on a tentative Hold first. "With email" tells the candidate their time is pending; "without email" waits until it's confirmed. |
Auto Confirm Hold Interviews | A template setting that confirms a Hold the moment every interviewer accepts, then sends the candidate their calendar invite. |
Confirmation email | The candidate email with final interview details. It sends on a Hold-with-email flow and on manual confirms — but not when a request-availability interview auto-confirms with Require Review off (the candidate still gets the calendar invite). |
Where Require Review lives | Three places: Company (Interview Settings), Template (Template Settings), and per-interview (the Confirmation Page). The template level is where most teams automate. |
At a Glance
The full setup flow on one page. Each step is explained in detail in the sections that follow.
Why Turn Auto Confirm On
Auto Confirm removes the last manual step in scheduling, and it's the single biggest time-saver for your coordinators. Here's what turning it on does.
Books while the candidate is engaged. GoodTime confirms from the earliest availability a candidate shares, so interviews land in minutes instead of waiting in a queue for approval.
Frees your coordinators. Confirmed-ready times stop piling up on the dashboard. Your team handles the exceptions, not every routine booking.
Same scheduling intelligence. Auto Confirm uses the exact slot-finding, time-zone, business-hours, and load-balancing logic as a manual schedule — it only removes the click.
A faster, cleaner candidate experience. Quicker confirmation and less back-and-forth email.
Scales with volume. Busy stages run themselves, so you add capacity instead of headcount.
Worried about losing control? You decide which templates auto-confirm, you keep full visibility on the dashboard (Pending Candidate Response, Confirmed), and you can still keep review on for the rare interview that truly needs a human check.
How Auto Confirm Works
When a candidate shares availability, GoodTime takes the interview as far as you let it. There are four possible outcomes, controlled by two settings.
Request-availability outcome | What GoodTime does | Candidate confirmation email |
Automatically Confirm (Require Review off) | Books and confirms from the candidate's earliest availability; sends calendar invites to everyone. | No (calendar invite only) |
Hold with email | Books interviewers tentatively and emails the candidate that their time is pending. | Yes, once it confirms |
Hold without email | Same as above, but the candidate isn't notified until it's confirmed. | Yes, once it confirms |
Require Review (Require Review on) | A coordinator confirms the interview by hand in the Schedule Now workflow. | Yes, on confirm |
Two settings decide which outcome you get:
Require Review — turn it off on a template to auto-confirm request-availability interviews outright.
Auto Confirm Hold Interviews — for Hold flows, turn it on so the interview confirms itself the moment all interviewers accept.
Recommended default — turn Require Review off for the templates you schedule the same way every time, and turn Auto Confirm Hold on wherever you use Hold. Keep review on only where a coordinator genuinely must check each interview.
Pre-Launch Checklist
Auto Confirm can only book the times your interviewers actually have, so audit capacity before you switch it on. Three checks:
Confirm the panel is set and has capacity. Interviewers or a tag pool are on the template, with enough open calendar slots and weekly interview limits for your candidate volume.
Add backup interviewers. Two or more alternates (or a tag pool) so a single decline doesn't stall a booking — this is also what lets Auto-Replace Declined do its job.
Set the right business hours. The template's hours match the region it serves, so Auto Confirm never offers odd-hour times.
Why this matters — when Require Review is on, a coordinator catches a thin calendar before confirming. With Auto Confirm on, the template stands on its own, so capacity is the one thing to get right first.
Step 1 — Choose Where to Turn It On
Require Review can be set in three places. Pick the one that matches how consistently you want to automate.
Level | Where you set it | Use it when |
Company | Interview Settings page | You want every interview to auto-confirm by default (turn the company toggle off). |
Template | Template Settings → Require Review Before Scheduling | You always schedule a given interview type the same way. This is where most teams automate. |
Per-interview | The Confirmation Page during Request Availability | You want to override the default for a single candidate. |
At the template level you'll see three options: Company Default, Require Review, and Review NOT Required.
Recommendation — default your repeatable templates (recruiter screens, hiring-manager screens, standard rounds) to Review NOT Required. Keeping the company default on while switching specific templates off gives you automation exactly where you want it, with a safety net everywhere else.
Step 2 — Turn Off Require Review
Setting a template to Review NOT Required makes every interview scheduled from it confirm automatically.
Open the interview template and go to Template Settings.
Find Require Review Before Scheduling.
Choose Review NOT Required (not Company Default), so the template auto-confirms no matter the company setting.
Save.
From now on, GoodTime matches the candidate's earliest availability to your interviewers, books the interview, and sends calendar invites to the interviewers and the candidate.
One thing to know — a request-availability interview that auto-confirms this way does not send a separate confirmation email (the candidate still gets the calendar invite). If you want that confirmation email too, use the Hold-with-email flow in Step 3.
Step 3 — Keep the Confirmation Email with Auto Confirm Hold
You can have full automation and a candidate confirmation email — use Hold with email together with Auto Confirm Hold.
Set the request-availability flow to Hold with email. GoodTime books your interviewers tentatively and emails the candidate that their time is pending.
In Template Settings, turn on "Automatically confirm Hold interviews when everyone has accepted."
Once every interviewer accepts their tentative invite, GoodTime moves the interview from Hold to Confirmed and sends the candidate's calendar invite and confirmation.
When to choose this — whenever the confirmation email matters (candidate-facing details or instructions) but you still want the booking to run itself.
Step 4 — Make the Template Ready to Run Unattended
Auto Confirm leans entirely on the template, so set these before you roll out.
Setting | Recommendation |
Require Review | Off (Review NOT Required) for the stages you're automating. |
Interviewers / tags | Named on the panel. Use "or" logic for pools so GoodTime spreads load, and confirm there's enough capacity for your volume. |
Auto-Replace Declined Interviewers | On, with at least two alternates or a tag pool. A 48–72 hour replacement window is common. |
Auto Confirm Hold Interviews | On if you use Hold and want it to confirm the moment interviewers accept. |
Business hours | Set to the region the template serves (e.g. EMEA hours for an EMEA template). |
Video & coding tools | Set Zoom, CoderPad, or similar in the template so links generate automatically. |
Candidate self-reschedule | On, so candidates fix conflicts without a coordinator. |
Step 5 — Test Before You Roll Out
Run one test candidate end to end so you see exactly what a real candidate will.
Use a test candidate on a test job (or a real job).
Send a Request Availability from the template and submit availability as the candidate.
Confirm the interview books and confirms with no one clicking.
Check | What good looks like |
Scheduling | Books from the candidate's earliest availability, in their time zone. |
Confirmation | Interview moves to Confirmed automatically (or Hold → Confirmed once interviewers accept). |
Invites | Interviewers and candidate receive calendar invites; the confirmation email sends if you used Hold with email. |
Declines | A declined interviewer is auto-replaced from the pool. |
Reschedule | The candidate can self-reschedule within your limits. |
If something's off — check the template's Require Review setting and panel first, then capacity. If it still misbehaves, contact GoodTime support with the template and the test candidate.
Step 6 — Roll Out and Expand
Start with one template, confirm it runs clean, then widen.
Activate by saving the template setting. It applies to interviews scheduled from then on.
Monitor the dashboard for conflicts (e.g. a decline that couldn't be replaced), and recheck capacity now and then — there's no alert when availability runs low.
Expand to your next repeatable template once the first is smooth. Recruiter and hiring-manager screens are the easiest wins; move to standard rounds from there.
Keep review on only where it earns its place — the rare interview a coordinator must personally check.
Companion resource — the Automate an Interview Template decision flowchart walks through the same choices visually, from capacity checks to turning Auto Confirm on.
FAQ & Troubleshooting
How it works
Question | Answer |
Does Auto Confirm schedule differently from a manual booking? | No. Slot-finding, time zones, business hours, load balancing, and declined-interviewer handling all work the same — it only removes the confirm click. |
Does the candidate get a confirmation email? | On a request-availability interview with Require Review off, no (they get the calendar invite). On a Hold-with-email flow with Auto Confirm Hold, yes. |
What's the difference between Require Review off and Auto Confirm Hold? | Require Review off confirms a request-availability interview outright. Auto Confirm Hold confirms a Hold once all interviewers accept. |
Setup & settings
Question | Answer |
Where do I turn Require Review off? | At the company level (Interview Settings), the template level (Template Settings → Review NOT Required), or per-interview (the Confirmation Page). |
If I set it on the template, does the company toggle still matter? | No. "Review NOT Required" on the template overrides the company default for that template. |
Do I need backup interviewers? | Strongly recommended. With two or more alternates or a tag pool, Auto-Replace Declined keeps a decline from stalling the booking. |
Credit, visibility & edge cases
Question | Answer |
Who gets scheduling credit when it's automated? | The coordinator on the interview; credit is assigned automatically once the candidate confirms. |
Can I see what auto-confirmed? | Yes — dashboard statuses (Pending Candidate Response, Confirmed) and Insights reporting. |
What if no interviewer is free? | The candidate sees no times on the request link and is asked to reach out to their coordinator. |
Can I still review a one-off? | Yes. Turn Require Review on for that single interview on the Confirmation Page. |
Related articles
Interview Settings — Require Review Before Scheduling: https://support.goodtime.io/articles/1738781107-interview-settings-require-review-before-scheduling
Interview Settings — Require Review Automations: https://support.goodtime.io/articles/5372022720-interview-settings-require-review-automations
How To — Automatic Scheduling: https://support.goodtime.io/articles/7305633979-how-to-automatic-scheduling
Interview Template — Template Settings Overview: https://support.goodtime.io/articles/1783873633-interview-template-template-settings-overview
Automated Workflows: Setup + Best Practices: https://support.goodtime.io/articles/3356380291-automated-workflows-setup-best-practices